Allure Report is an open-source multi-language test reporting tool. It builds a detailed representation of what has been tested and extracts as much information as possible from everyday test execution.
In this guide, we'll take a journey through the main steps toward creating your first Allure report and discover all the fancy features it brings to routine automated testing reports.
Since Allure Report has various integrations with various testing frameworks on different programming languages, there is a chance that some steps will vary for each reader, so feel free to jump into the official documentation page for details.
Installing Allure Report
As always, the first step is to install the Allure library. The exact steps vary depending on your OS:
Homebrew (for macOS and Linux)
For Linux and macOS, automated installation is available via Homebrew
brew install allure
Scoop (for Windows)
For Windows, Allure is available from the Scoop command-line installer.
To install Allure, download and install Scoop, and then execute the following command in Powershell:
scoop install allure
System package manager (for Linux)
Go to the latest Allure Report release on GitHub and download the allure-*.deb or allure-*.rpm package, depending on which package format your Linux distribution supports.
Go to the directory with the package in a terminal and install it.
For the DEB package:
sudo dpkg -i allure_2.24.0-1_all.deb
For the RPM package:
sudo rpm -i allure_2.24.0-1.noarch.rpm
NPM (any system)
Make sure Nodejs and NPM are installed.
Make sure Java version 8 or above is installed and its directory is specified in the JAVA_HOME environment variable.
In a terminal, go to the project's root directory for which you want to use Allure Report. Run this command:
npm install --save-dev allure-commandline
This installation method only makes Allure Report available in the given project's directory. Also note that the commands for running Allure Report must be prefixed with npx, for example:
npx allure-commandline serve
From an archive (any system)
Make sure Java version 8 or above is installed and its directory is specified in the JAVA_HOME environment variable.
Go to the latest Allure Report release on GitHub and download the allure-*.zip or allure-*.tgz archive.
Uncompress the archive into any directory. The Allure Report can now be run using the
bin/allureorbin/allure.batscript, depending on the operating system.
With this installation method, the commands for running Allure Report must contain the full path to the scripts, for example:
D:\Tools\allure-2.24.0\bin\allure.bat serve
Check the installation
Once you've followed one of the above steps, it's a good idea to check if Allure is now available on your system:
$ allure --version
2.24.0
Plugging Allure Report into code
The next step is to provide all the necessary dependencies in a configuration file so that your build tool can use Allure.
Each framework and build tool has its own configuration settings, so the best way to get a clue on adding dependencies is to look for an example at the documentation page or get an example at GitHub.
Adding annotations to the report
After plugging Allure Report into the codebase, we can run it. You will get a pretty report, though it won't have much to tell (at least compared to its full potential):
We need to annotate the tests to provide all the necessary data to Allure. There are several types of annotations:
- Descriptive annotations that provide as much information as possible about the test case and its context
- The step annotation, the one that allows Allure to build nice and detailed test scenarios
- Parameterized annotations that can accept values from the test's own inputs
Descriptive annotations
Let's go over the existing annotations one by one.
@Epic, @Feature, @Story:
This is a set of annotations designed to make test-case tree grouping more flexible and informative. The annotations follow the Agile approach for task definition. These annotations may be implemented on the class or on the method level.
Epic defines the highest-level task that will be decomposed into features. Features will group specific stories, providing an easily readable structure.
As a story is the lowest part of the epic-feature-story hierarchy, the class-level story adds data to all class methods.
@Description
An annotation that provides a detailed description of a test method/class to be displayed in the report.
@Owner
A simple annotation to highlight the person behind the specific test case so that everyone knows whom to ask for a fix in case of a broken/failed test. Quite useful for large teams.
@Severity
In Allure, any @Test can be defined with a @Severity annotation that accepts any of the following values:
SeverityLevel.BLOCKERSeverityLevel.CRITICALSeverityLevel.NORMALSeverityLevel.MINORSeverityLevel.TRIVIAL
The severity level will be displayed in the report so that the tester understands how serious the problem is if a test has failed.
Sample Tests
Let's take a look at an example of these annotations in Java (annotations for any other language will look similar):
public class AllureExampleTest {

    @Test
    @Epic("Sign In flow")
    @Feature("Login form")
    @Story("User enters the wrong password")
    @Owner("Nicola Tesla")
    @Severity(SeverityLevel.BLOCKER)
    @Description("Test that verifies a user cannot enter the page without logging in")
    public void annotationDescriptionTest() {}

    /**
     * JavaDoc description
     */
    @Test
    @Description(useJavaDoc = true)
    public void javadocDescriptionTest() {}
}
The Step annotation
Detailed reporting with steps is one of the features people love about Allure Report. The @Step annotation makes this feature possible by providing a human-readable description of any action within a test. Steps can be used in various testing scenarios. They can be parametrized, make checks, have nested steps, and create attachments. Each step has a name.
To define steps in code, each method should have a @Step annotation with a String description; otherwise, the step name equals the annotated method name.
A step can extract the names of fields using reflection so that they can be used to, e.g., provide the name of the step.
Here are several examples of what the Step annotation looks like in code:
package io.qameta.allure.examples.junit5;

import io.qameta.allure.Allure;
import io.qameta.allure.Step;
import org.junit.jupiter.api.Test;

public class AllureStepTest {

    private static final String GLOBAL_PARAMETER = "global value";

    // A test inside which a @Step-annotated method is used
    @Test
    public void annotatedStepTest() {
        annotatedStep("local value");
    }

    // A test with a step implemented using a lambda
    @Test
    public void lambdaStepTest() {
        final String localParameter = "parameter value";
        Allure.step(String.format("Parent lambda step with parameter [%s]", localParameter), (step) -> {
            step.parameter("parameter", localParameter);
            Allure.step(String.format("Nested lambda step with global parameter [%s]", GLOBAL_PARAMETER));
        });
    }

    // The methods that can be used as steps
    @Step("Parent annotated step with parameter [{parameter}]")
    public void annotatedStep(final String parameter) {
        nestedAnnotatedStep();
    }

    @Step("Nested annotated step with a global parameter [{this.GLOBAL_PARAMETER}]")
    public void nestedAnnotatedStep() {

    }
Parameterized annotations
@Attachment
This annotation allows attaching a String or Byte array to the report. It is very helpful if you need to show a screenshot or a failure stack trace in your test results.
@Link
It's just as the name suggests: if you need to add a link to the test, be it a reference or a hyperlink, this is the annotation you need.
It takes several parameters:
name: link texturl: an actual linktype: type of linkvalue: similar to name
@Muted
An annotation that excludes a test from a report.
@TmsLink
A way to link a result with a TMS object, if you use any. Allows entering just the test case ID that will be added to the pre-configured (via allure.link.tms.pattern) URL. The annotation takes a String value, the link to the management system. For example, if the link to our test case on the TMS is https://tms.yourcompany.com/browse/tc-12, then we can use tc-12 as the value.
Running Allure Report
Local launch
Running Allure Report locally is a great way to get started with it. However, remember that local execution does not provide execution, result history, or trend graphs.
Generally speaking, the easiest way to try Allure Report is to download a pre-made empty project from Allure Start. There, you can select any tech stack you want; download the project, add some sample tests, and build it.
However, here, we're going to go with an example that already has some tests in it, because we want to show you Report's features. You can follow along by downloading the code from the GitHub link. The example uses JUnit 5 and Gradle.
Once you've downloaded the project and built it with Gradle, you can run the tests with the./gradlew test command. As soon as they have been executed, Gradle will store the test results in the target directory.
Let's take the data and build a report! With the allure serve /path/to/allure-results command, we start an Allure Report instance (the allure-results folder is usually in the build folder in the root of your project). It builds a local web report which automatically opens as a page:
CI (Jenkins, TeamCity, and Bamboo)
Instead of running Report locally, you can generate on a CI server. Allure Report has great integrations with multiple CI systems. Each system setup has specificities, and we won't cover them all in this post; you can follow the Documentation page for steps to create a report with a CI system (e. g. Jenkins).
Allure Report Features
Now that we've set up the basic functionality, you can build upon it with other features of Allure Report.
Attachments
Often, it's not enough to read the list of executed steps; you need to closely examine the system under test. Allure Report allows you to automatically gather all kinds of data about the system you're testing - take screenshots, gather webpage source code, etc. For this, we either leverage the existing functionality of your framework or create this functionality from scratch. Once collected, the data is attached to your report:
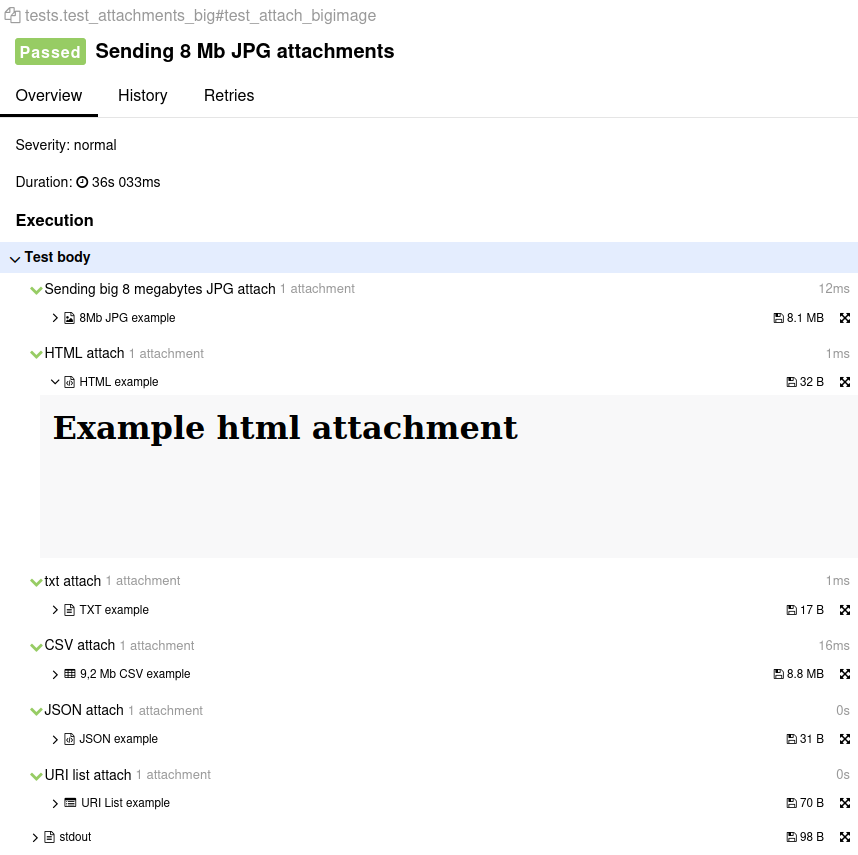
This way, you've got exhaustive information necessary to diagnose and reproduce bugs.
Integrations
Allure Report is polyglot: it works with pretty much any popular framework. The architecture of Report has been designed to simplify the process of making integrations, and we've put a lot of thought and effort into creating them.
A full list of integrations is available on our website. Detailed instructions for different frameworks are available in our documentation (for Java, Python, etc.).
The integrations, together with the steps, help hide any technical details of your tests (such as programming language and test framework), so the interface presents the test scenario in a form familiar to manual testers or managers.
Categories
Categories are one of the most time-saving features of Allure Report. They provide simple automation for fail resolution. There are two categories of defects by default:
- Product defects (failed tests)
- Test defects (broken tests)
Categories are fully customizable via simple JSON configuration. To create custom defects classification, add a categories.json file to the allure-results directory before report generation.
- Open JSON template
[ {"name": "Ignored tests", "matchedStatuses": ["skipped"] }, {"name": "Infrastructure problems", "matchedStatuses": ["broken", "failed"], "messageRegex": ".*bye-bye.*"}, {"name": "Outdated tests", "matchedStatuses": ["broken"], "traceRegex": ".*FileNotFoundException.*"}, {"name": "Product defects", "matchedStatuses": ["failed"] }, {"name": "Test defects", "matchedStatuses": ["broken"] } ]
The JSON includes the following data:
- (mandatory) Category name
- (optional) list of suitable test statuses. The default ones are: ["failed", "broken", "passed", "skipped", "unknown" ]
- (optional) regex pattern to check the test error message. Default value: "._"
- (optional) regex pattern to check the stack trace. Default value: "."
A test result falls into a category if its status is in the list and both the error message and the stack trace match the pattern.
If you're using allure-maven or allure-gradle plugins, categories.json file can be stored in the test resources directory.
Parameterized tests
Allure knows how to work with parameterized automated tests. Let's take a JUnit test as an example. First, let's create a test class with a parameterized test:
@Layer("rest")
@Owner("baev")
@Feature("Issues")
public class IssuesRestTest {

    private static final String OWNER = "allure-framework";
    private static final String REPO = "allure2";

    private final RestSteps steps = new RestSteps();

    @TM4J("AE-T1")
    @Story("Create new issue")
    @Microservice("Billing")
    @Tags({@Tag("api"), @Tag("smoke")})
    // The important annotation:
    @ParameterizedTest(name = "Create issue via api")
    @ValueSource(strings = {"First Note", "Second Note"})
    public void shouldCreateUserNote(String title) {
        steps.createIssueWithTitle(OWNER, REPO, title);
        steps.shouldSeeIssueWithTitle(OWNER, REPO, title);
    }
After execution, Allure provides the parameterized test run results as a set of tests, with the value of the parameter specified in the overview of each test:
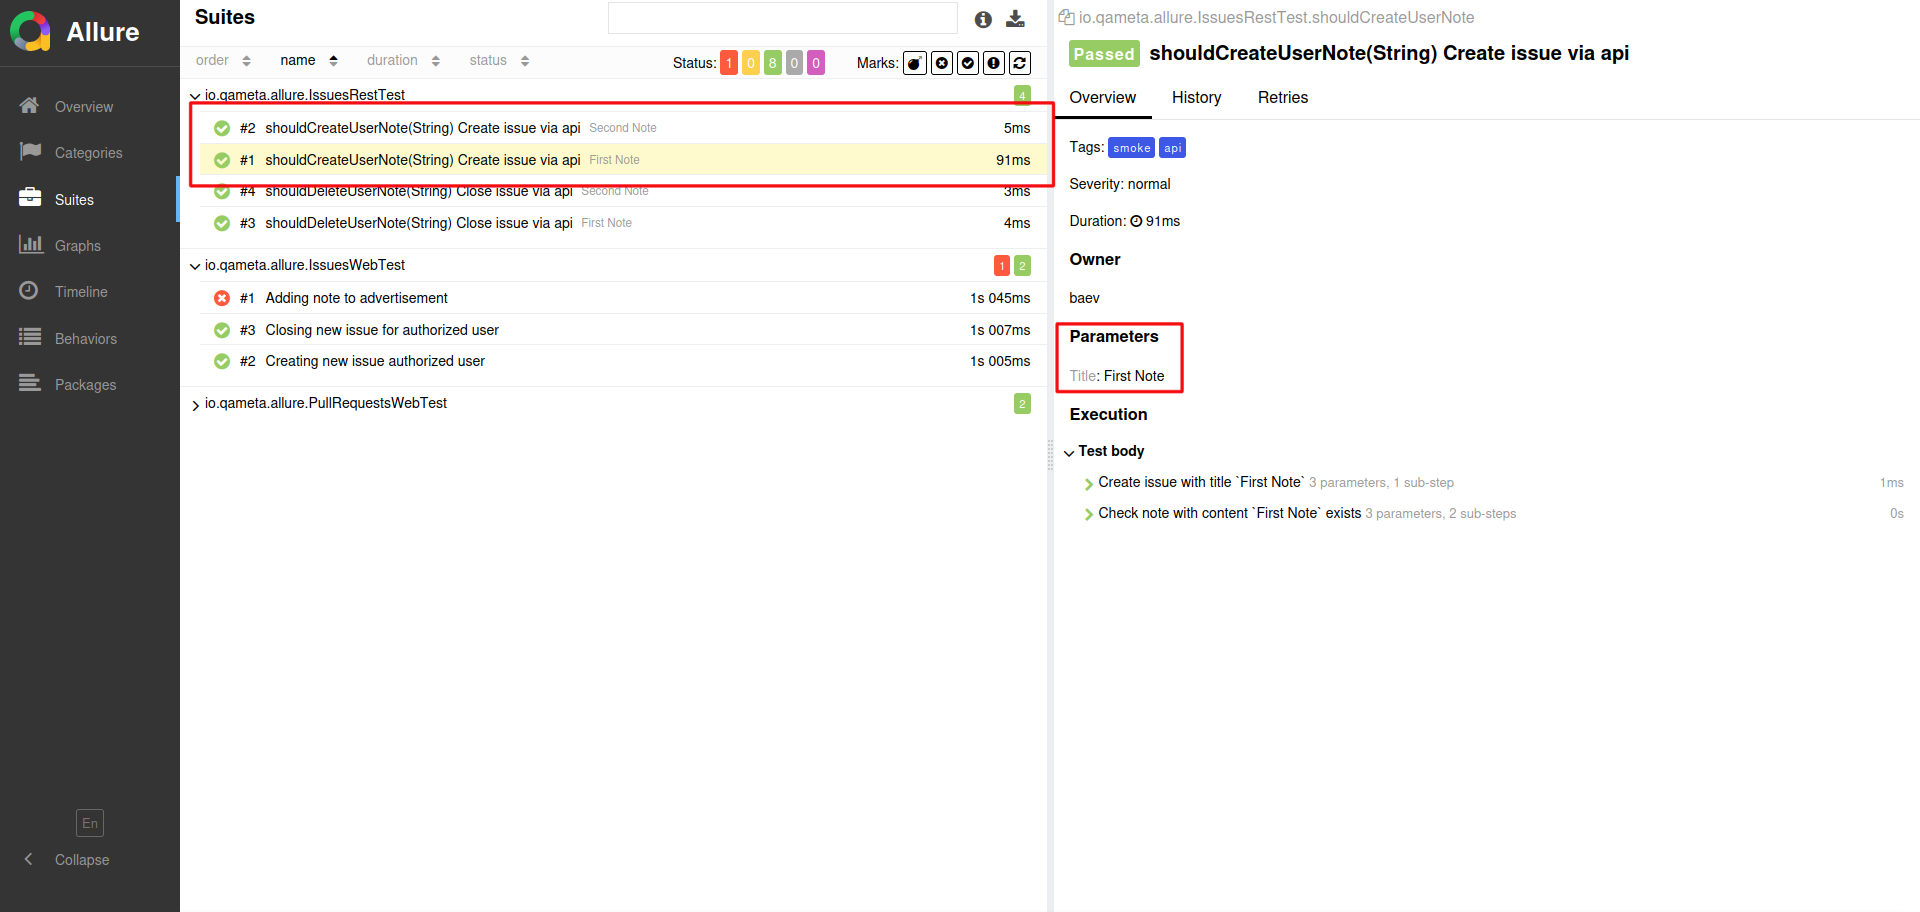
If any tests fail, Allure provides detailed information about that particular case.
Retries
Retires are executions of the same test cases (a signature is calculated based on the test method name and parameters) within one test suite execution, e.g., when using TestNG IRetryAnalyzer or JUnit retry Rules. Unfortunately, this is not supported for local runs.
Test History
Allure Report supports history for tests. At each report generation during the build, the Allure Plugin for Jenkins will try to access the working directory of the previous build and copy the contents of the allure-report/history folder to the current report.
Currently, the history entry for the test case stores information for up to 5 previous results, and it is not available for local runs.
Report Structure and Dashboards
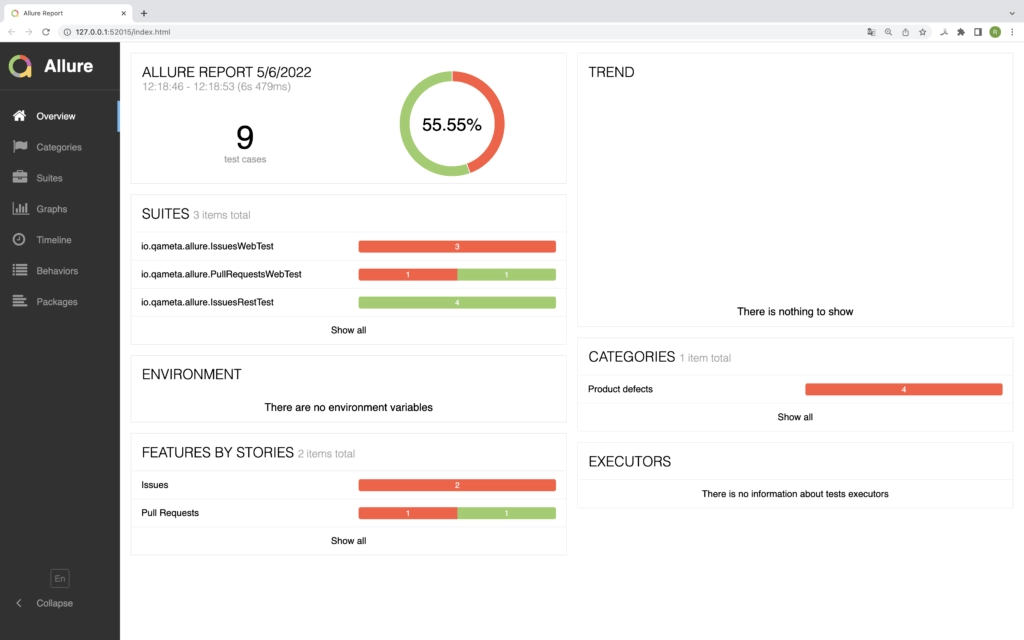
Now, let's go over the structure of a report, as it is presented in the main menu:
Overview
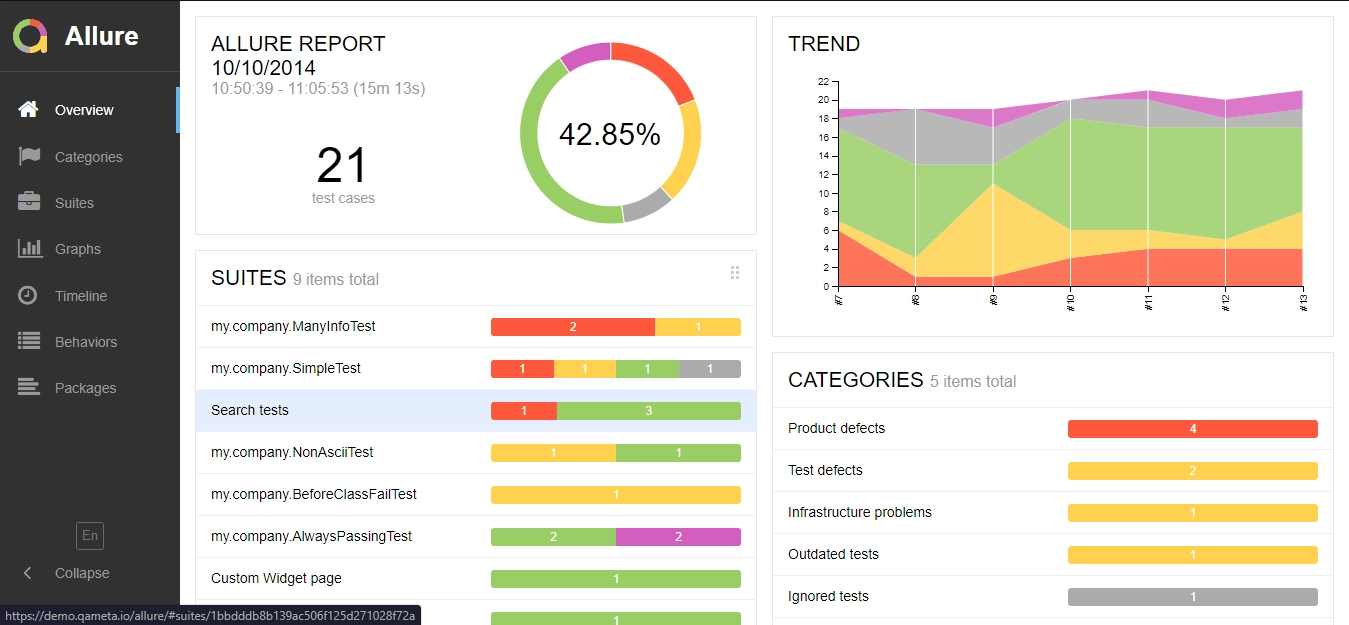
The default page would be the 'Overview' page with dashboards and widgets. The page has several default widgets representing the essential characteristics of your project and test environments:
- Statistics - overall report statistics.
- Launches - statistics by launch, provided that the report is based on multiple launches.
- Behaviors - information on results aggregated according to stories and features.
- Executors - information on test executors used to run the tests.
- History Trend - if tests accumulate some historical data, a trend will be calculated and shown on the graph.
- Environment - information on the test environment.
Home page widgets are draggable and configurable. Also, Allure supports its own plugin system, so you can have very different widget layouts.
Categories
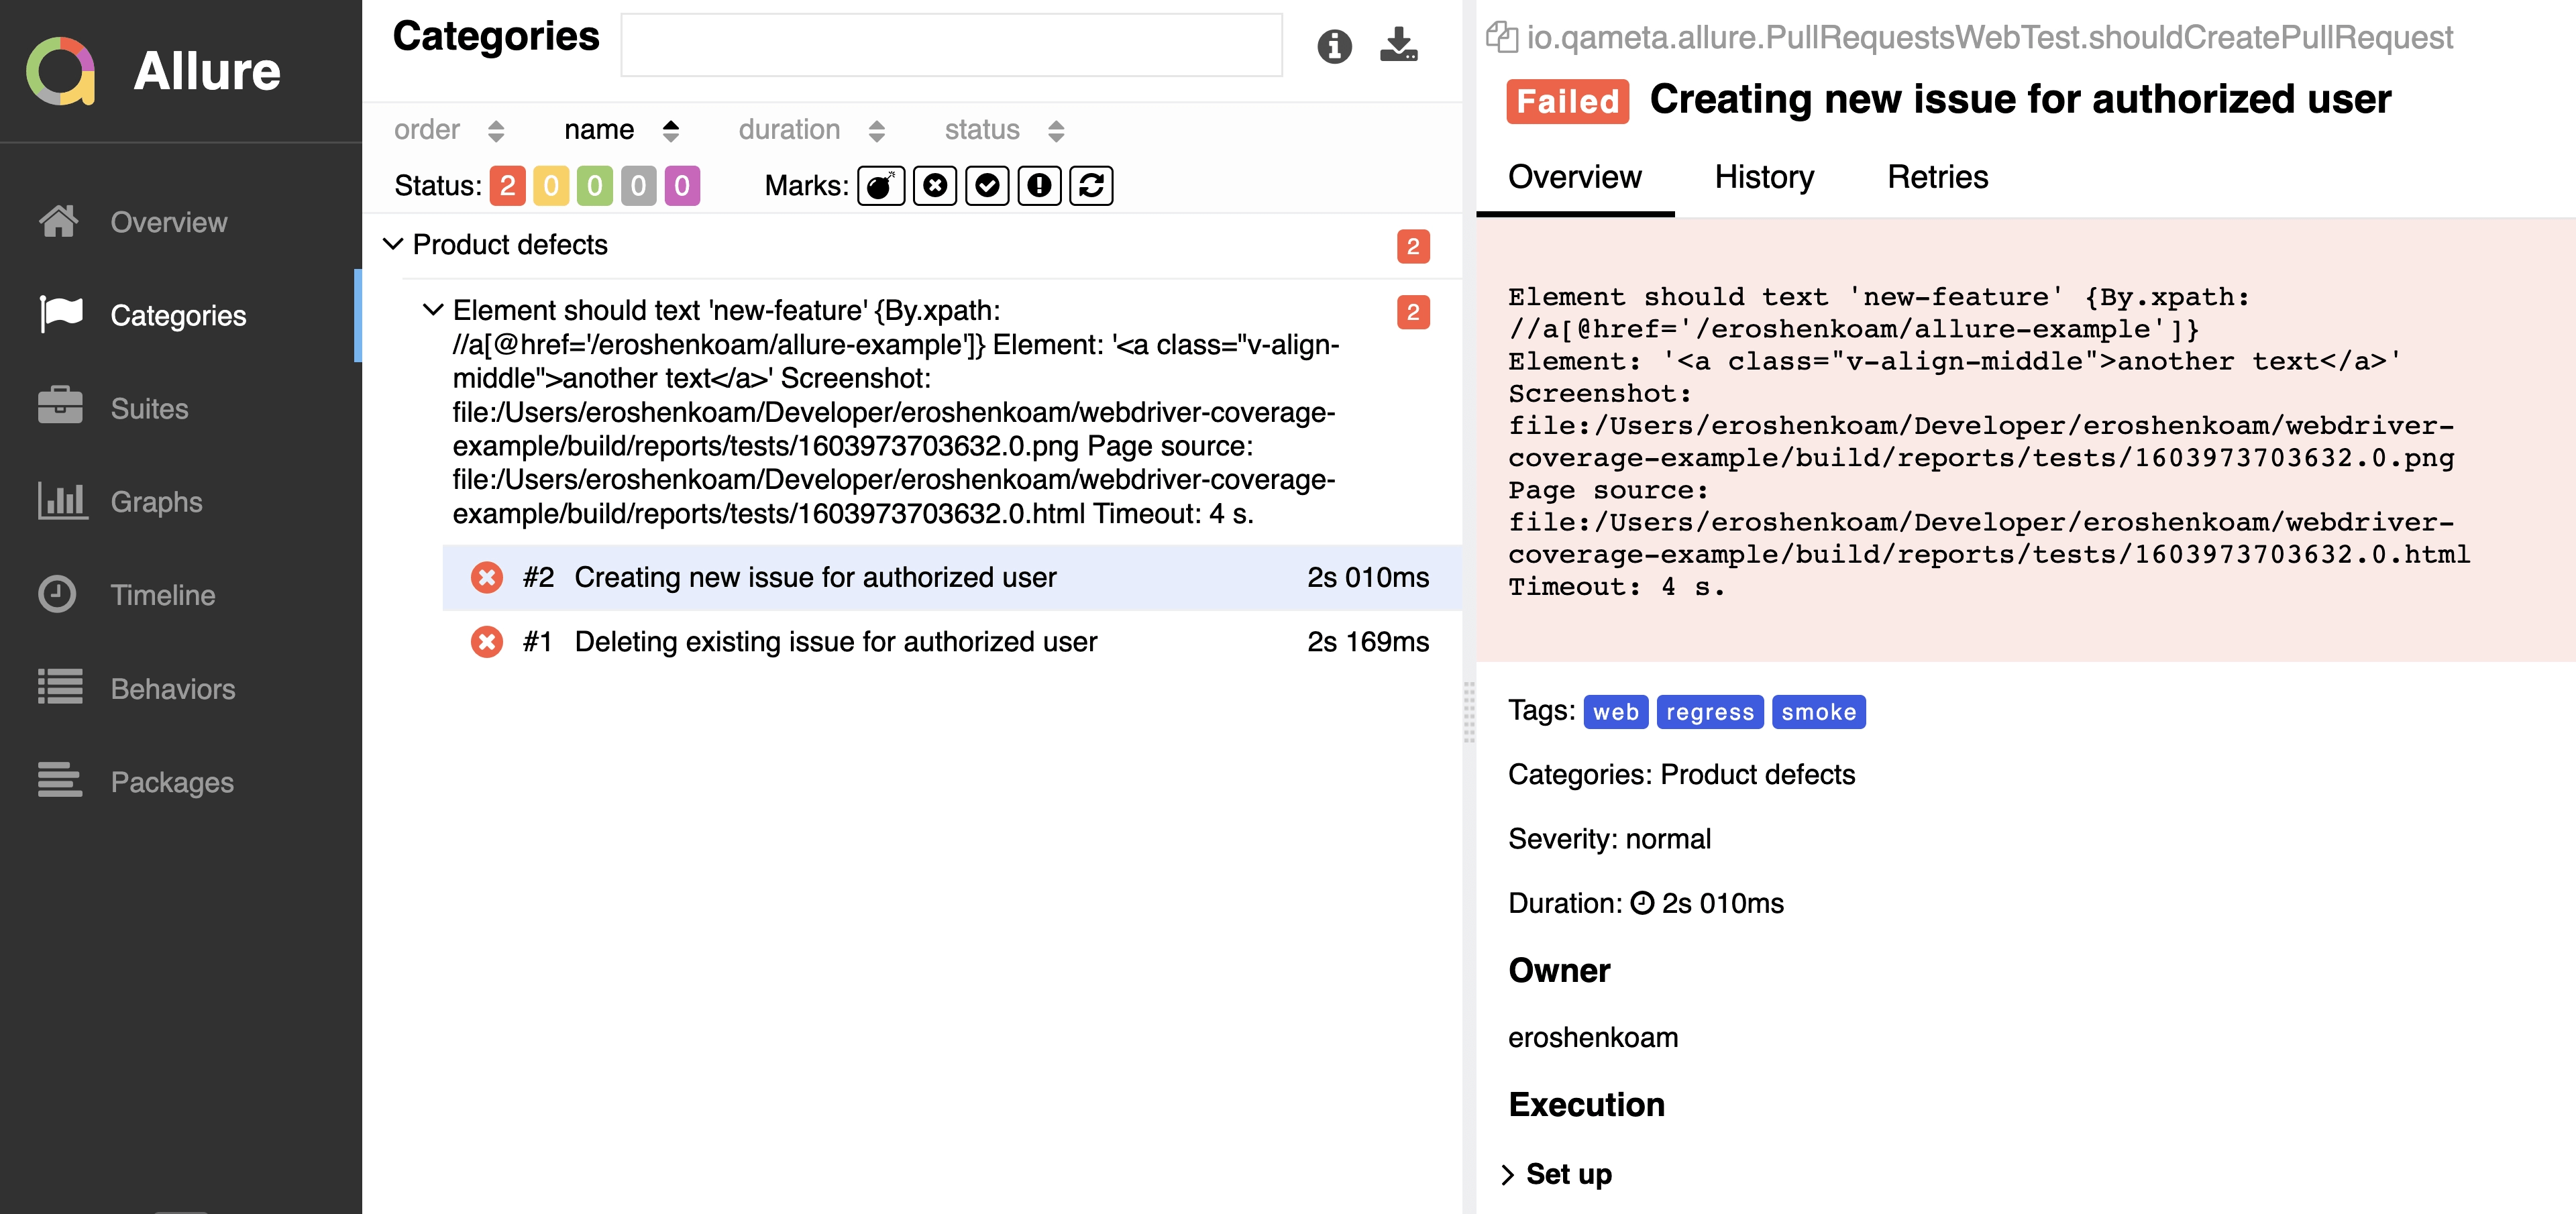
This page shows all defects. Assertion failures are reported as 'Product defects', whereas failures caused by exceptions are shown in the report as 'Test defects'.
Suites, Behaviors, and Packages
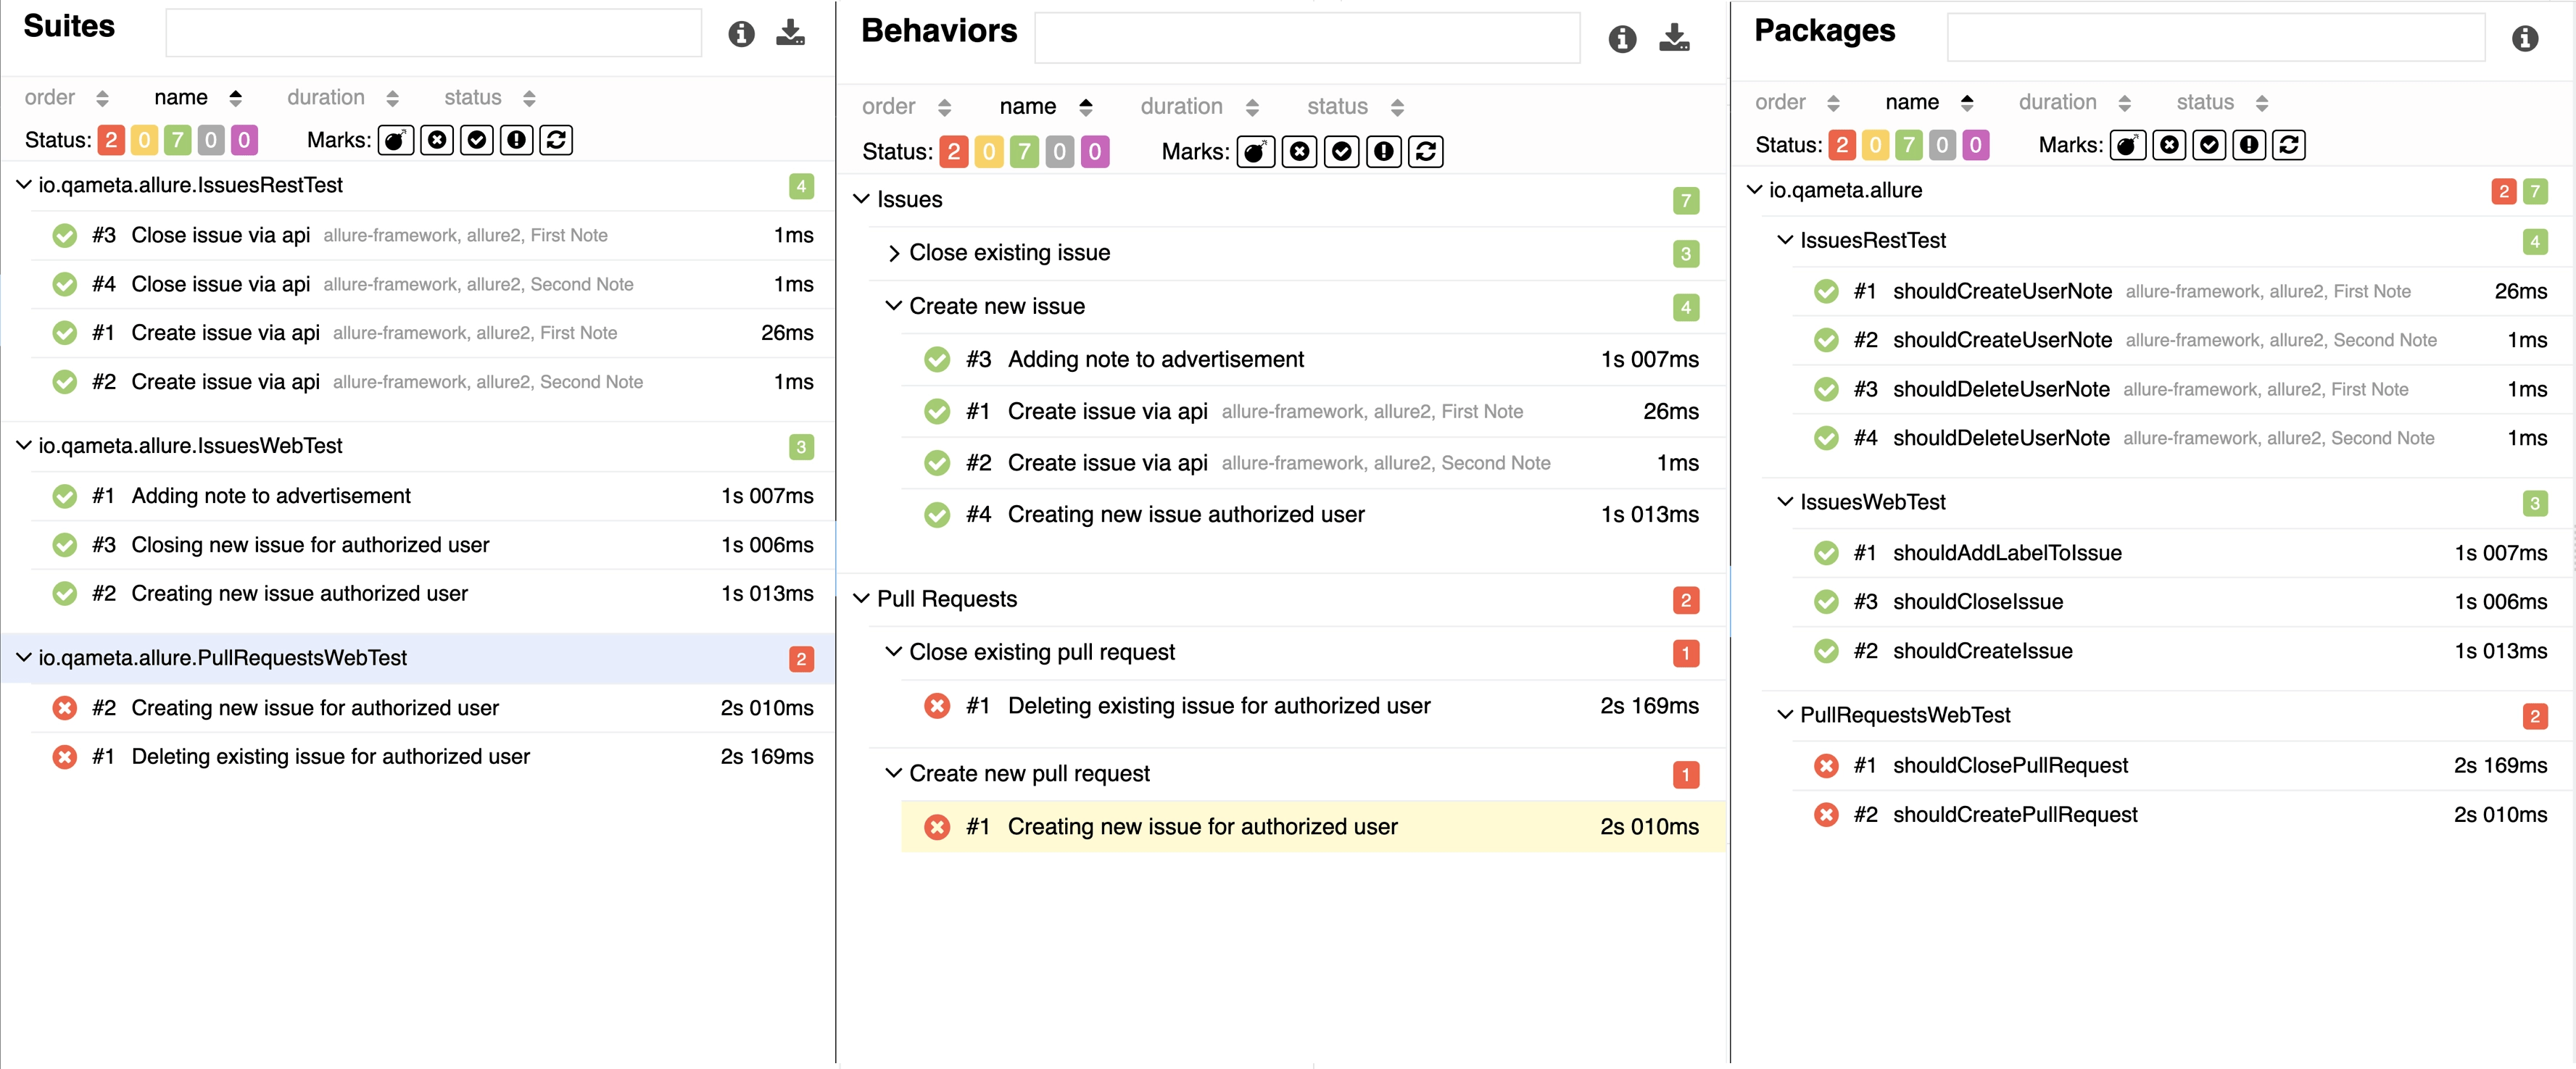
Three tabs that show the test case tree with tests grouped by:
- Suites. This tab displays test cases based on the suite executed.
- Behaviors. Here, the tree is based on stories and feature annotations.
- Packages. In this tab, the test cases are grouped by package names.
Graphs
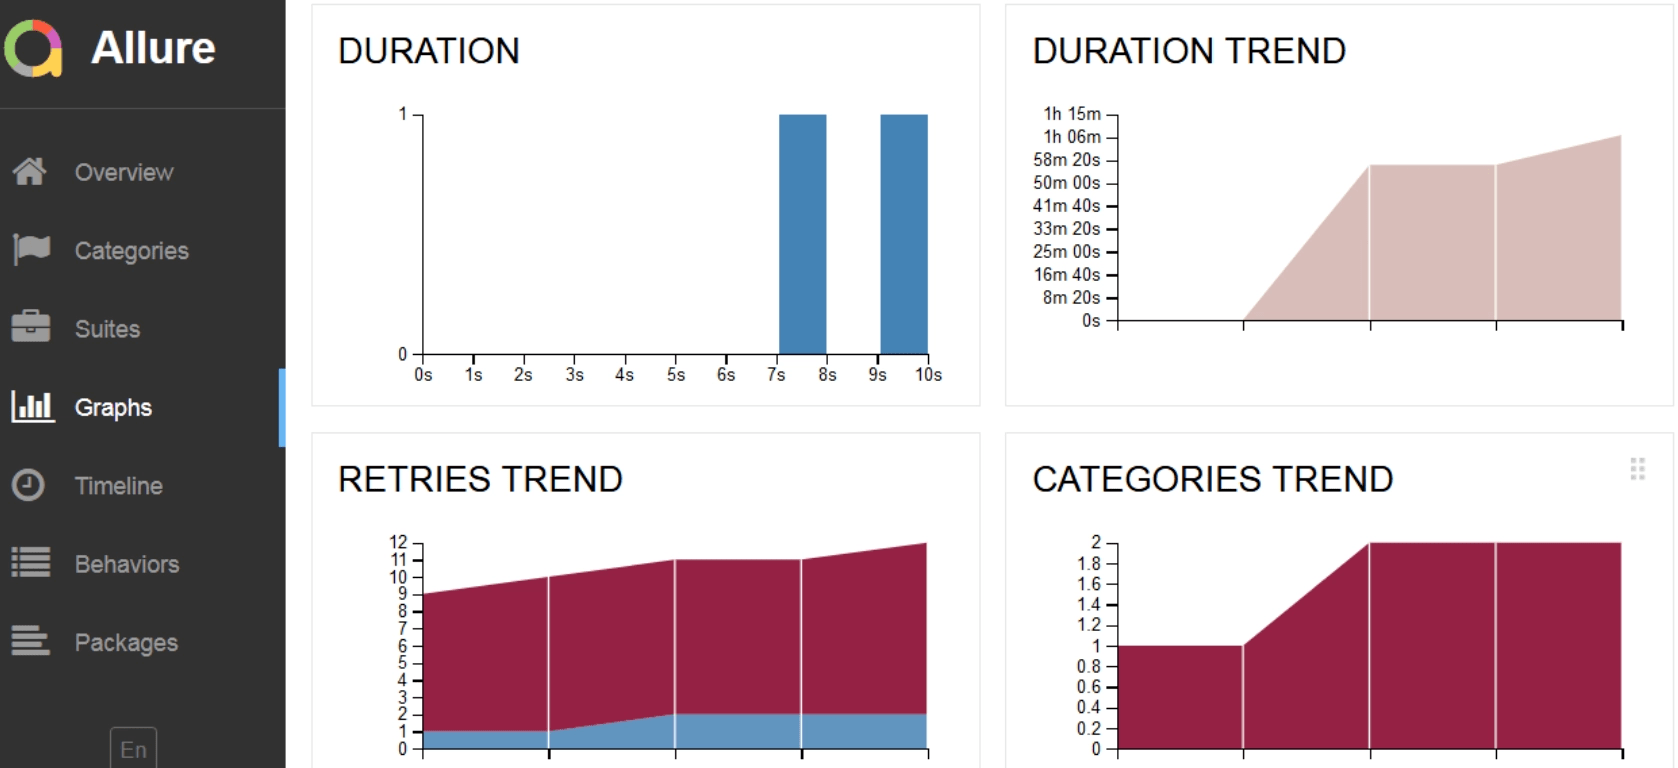
On this tab, test results are visualized with charts. The default configurations provide:
- A pie chart with general execution results.
- A duration trend of test case execution. This is a nice feature if you need to investigate which tests require more time and optimization.
- The retries trend shows how tests are re-executed during a single test run.
- The categories trend shows the categories of defects encountered.
Timeline

This view displays the timeline of executed tests.
Conclusion
Allure Report is being used by millions of people, and it has become a mainstay of test automation, which is why we will continue supporting and perfecting this tool. If you're spending too much time digging through your test results, or if you want to show them to other people who don't code - Allure Report is the tool for you.